Saturday, April 9, 2022

Progress and Update

 originally filed 3/13/22 

So lots of progress this weekend.

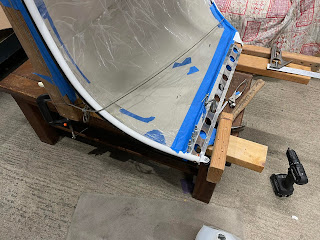
I was able to match drill the inner and outer skirts with the help of a friend. I learnt that the outer skirt match drilling to the canopy frame is best done with the canopy on the fuselage, so the curve of the skirt exactly matches the curve of the fuselage.

Also, I am thinking about using my version 2 method to attach the outer skirt to the canopy frame. The main difference is using Pro-seal and not sikaflex between the outer skirt and the frame. The reason is that sikaflex requires too much masking, runs when wet, and will be very hard to control due to the inner skirt being in the way of pulling off the masking. Besides, with the rivets per the plans, I do not need to glue the skirts to the canopy frame, just provide a seal. I will save the sikaflex for when I actually need a strong bond.

Below is the version 2 method.

By the way, my nickname

at work was John 
Change S... Always looking to improve.

canopy Ugh

 Canopy; once I get thru this, hopefully I will be done learning as the FAA calls it.


So my side skirts are done and I am ready to bond onto the frame.
But I noticed the skirts wanted to pull in when cleco'd to the frame. So I added some epoxy/flox/cab-o-sil mixture to the spots where the canopy sticks out pass the frame. This allows the canopy skirt to sit nice all the way to the fuselage. In the picture one can see where the canopy was stick out past the canopy frame.

Following the lead of JCarne and Wirejock on these forums (thanks guys). I plane to sikaflex the canopy skirt to the canopy frame. I think I might use the Vans rivets to hold it all together. I am not using the inner skirt C-759 and hardware; instead using a big bead of sikaflex. It has held up for 2 years on the shelf, so it is good to go. The sikaflex on the outer is really just for sealing the canopy bubble to the side skirt.

I painted the outside skirt and brace (C-660 and C791) white to match the canopy frame. Right now everything is pilot drilled 3/32"and cleco'd.
I plan to drill the C791 to the C660 this weekend, then take apart, debur and dimple, countersink for rivets per plans, and re assembly with Van's rivets.

any comments welcomed. I see Wirejock just responded on another thread suggesting to just sikaflex everything together with minimal rivets; gotta think about that.


3/13/2022 EDITI would recommend not drilling the side skirt holes into the canopy frame while the frame is off the fuselage. I would recommend it is best to do this skirt to frame match hole drilling when the frame is on the fuselage. The reason is the skirt is curved. When on the bench, the position of this curve will be close to the fuselage curve, but wont exactly match. If one does this match hole drilling while the canopy frame is on the fuselage, then the curve will exactly match the fuselage curve. I found this out today when I drilled the inner skirt; it is really hard to adjust the outer skirt bend later when trying to drill the inner skirt; the metal is just too stiff.

Also, decided to Proseal instead of sikaflex the outer skirt to the canopy frame, see later posting


3/14/22 ok back to sikaflex. Not sure of the compatibility of proseal to canopy; we know sikaflex is good.


Tuesday, March 1, 2022

Back to Finishing Canopy

 So I am back to the canopy again. I did not do the side skirts a year and a half ago when I was working the canopy because I thought they would be prone to damage during storage.

So I am doing the side skirts now. I am following a friend's method  The side skirts will be the Van's aluminum that are sika-flexed to the canopy and riveted to the canopy frame. I am going to paint the side skirts white to match the canopy frame. I think I found a Jet flex paint that matches the Van's white.

The rear skirt will be fiber glassed and sika-flex bonded to the canopy. (Although my canopy fit is good enough for a metal skirt, I presently have no rivets or screw holes in the plexiglass, and I do not want to add screw holes to hold the metal rear skirt)

The windscreen will be fitted last. I still have to paint the glare shield and the middle brace a light grey before installing the wind screen.


Finishing Up Under Panel

 While waiting to paint the dashboard, i was finishing up stuff under the panel. I decided to make a j bend in the vent tubing to keep the rain out. Not sure if it helps or not, but what the heck, I had the extra tubing anyway.


Last Structural Panel Installed

 We installed the last structural panel this weekend; The forward fuselage top panel.

Now it is on to canopy fiber glassing, cowl
and the gear.

Seats


 I am calling the seats done. I still have to do some of the of the interior stitching but haven't figured out a better way than my first try.
Maybe good enough for first flight. Sure beats pillows.

Since this picture was taken i re did the one seat with the stitching. I think I will leave the interior stitching off so that I can remove the foam and wash the seat covers after the first flight.

Tuesday, January 4, 2022

Fiberglass Work Begins

 Having gone as far as I could go on the instrumentation and engine work, I am starting on the fiberglass bits. This consists of the elevator and rudder tips and the canopy framing.

The fiberglass work is not hard, just takes time due to the cure times. And I was really smart to wait until it gets really cold, and not during the warmer months, to do this work. The epoxy takes forever to cure in the cold. Should have done this work in the summer, but I really wasn't ready then anyway.

The tips come preformed, but require the ends be capped off. I used fiberglass foam, with 2 layers of cloth, followed by an epoxy and micro-balloon mixture. I also sealed the top of the vertical stabilizer to avoid water getting in, if it ever rains in the desert.

The tail light I am using is from FlyLEDS. The Vans rudder fairing has a very small provision for the light. The bracket


that came with the light would not work (gold anodized bracket) so I made a custom one (the aluminum horse shoe shape). The supplied screws are metric, 3.0 x .5 mm.