Friday, June 30, 2017

Fuel Tanks- Breath didnt Hold

Last report, I was holding my breath the fuel tanks would not leak.

Like all good learning experiences, my tanks leaked; both of them, mainly from the rear seam.

The one tank leaked from the seam near the fuel sender and access hole. This was easy enough to fix by removing the access panel and adding more goop. 

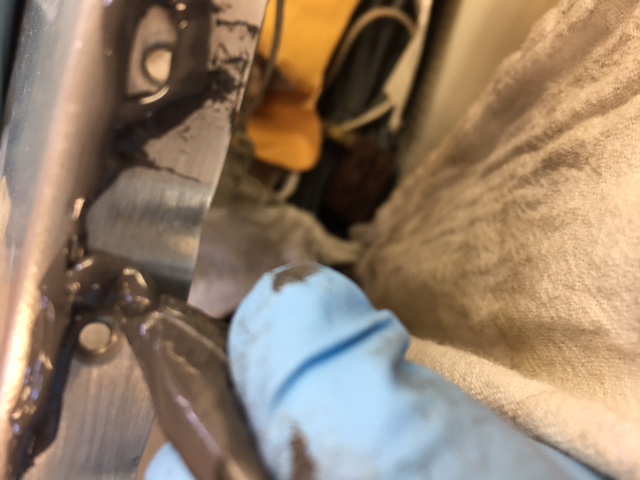
The tank in the picture leaked from the top seam near the middle, in 2 places. Ugh.

There were many options I found on-line to fix this:
1) use Loctite adhesive designed for just such a repair.
2) ignore it and hope it goes away.
3) cut a hole in the baffle, add more sealant and then use a new access plate to cover over hole.
4) use the really thin Proseal that is brushable, pour it in the tank and slosh it along the seam.
5) make a funky applicator with a syringe and tubing; using a USB camera, and add some more Proseal to the seam thru the filler neck or the sender access panel.

Of course, being the expert builder that I am, I did none of the above.

I decided to use option 6), which is not listed above. If that didn't work, use option 3.

Option 6) was to drill out the baffle rivets in the offending area, wrap a towel around the vacuum cleaner nozzle and tape it to the fuel filler spout. With the manometer hooked up, turn on the suction and leave the fuel sender screws out to avoid over pressurizing the tank (wouldn't this be under pressurizing?). Add some Proseal to the seam, and gently open the seam up by gently flexing the tank skin. To my surprise, the sealant sucked itself into the gap. I used a heat gun to gently heat the tank skin to help the Proseal flow into the cracks. The whole time the tank was under 27" of vacuum.

After resetting the rivets, I let the tank sit for a day. I started the pressure test tonight, and the leak check using soap bubbles showed no leakage. Normally I would say done, but I plan to let it sit over night just to make sure.


Sunday, June 25, 2017

Fuel tanks: Stop the madness, I am tired of learning

Fuel tanks are done, Yippee Ki Ya!

This last week has been fun learning how to play with ProSeal. The baffles and support brackets went on without much trouble.

For those of you building a RV9, it is important to note that the baffle doesn't naturally want to sit properly. The top and bottom skins are designed to not sit perpendicular to the back of the baffle.  So when the baffle is dropped in, it has to be forced to align with the internal ribs. Once the baffle was set down on the ribs, I pushed the baffle into alignment and pressed in a  -4 rivet thru the baffle into the ribs. This kept the baffle lined up while I inserted the gazillion silver clecos for the top and bottom row of -3 rivets, and clecos for the rest of -4 rivets for the baffle to ribs, without the brackets.

For the -3 clecos. I pushed in a -3 rivet every 10th hole to line up the skin and baffle before clecoing. Once all the clecos were inserted, I gently squeezed between each -3 rivet location with a Vise Grip welding pliers to squeeze out any excess Proseal.

I started riveting the -3's at the middle of the tank. I found I had to take the countersink (with a countersink stop) and touch up each hole before inserting the rivet; otherwise the heads were not always flush to the skin.

For the baffle to rib to bracket rivets, the pop rivets went in smoothly. I made sure I set the -3 and -4 rivets in one seating so the Proseal didn't have a chance to harden.

The sender, pickup and drain went in as per plans.

I am now in the waiting period when I am ignorant and happy, thinking the tanks are done and won't leak. Here is my leak check setup using the manometer method. I am expecting I can blow in the tubes enough to pressurize them to 27" of water. I am holding my breath hoping they won't leak.

Sunday, June 18, 2017

Fuel Tanks-Part 2

Tank assembly begins! 
The bottom stiffeners were installed as per plans. I mixed up 1 gram of Proseal per linear inch and this was just about right, taking into account losses from leaving stuff on the mixing plate, smeared on the ceiling, etc. Did I mention this stuff gets everywhere?

I decided to use the "faying surface sealing method". The next day, I mixed up another batch of Proseal per the instructions, and using the baggy technique, applied it to the ribs. I then cleco'd the ribs to the bottom skin using a cleco in every hole.


In the same session, I mixed a second batch and applied Proseal to the top of the ribs, inserted the tank into the frame and cleco'd the top of the skin to the ribs again using a cleco in every hole. Then I smoothed the excess bleed out with the tip of the plastic knife, and let it set overnight. I added tape to keep the skins from spreading due to the Proseal's viscosity.


The next day, I came back and removed every cleco four at a time, and used the #40 (-3) countersink to clean up the dimples. This removed the excess squeeze out and removed a sliver of aluminum to provide virgin material for the rivet to seal against.


I did not use "tank dies" because I don't believe in them. Tank dies are special dies only that set the rivet a few thousandths deeper. The theory being this allows the rivets to sit flush with a thin layer of Proseal in between the rivets and the skin. I think this is nonsense. Using normal dimple dies, the Proseal squeezed out during riveting and all that remained was what was needed to fill in the voids; I don't see a reason why there needs to be a thicker film of Proseal between the rivet and skin. Just my opinion.

Update-A factory  engineer wrote the following reply: I also have some concerns about the use of tank dimple dies, but in my opinion, by installing the ribs and then waiting to rivet, you just moved the thick build-up of sealant from between the rivet and skin, to between the skin and the rib.
The squeeze force of a cleco is much lower than what is exerted when setting a rivet.
The sealant is very viscous and doesn't easily squeeze out from between the rib and skin.
I am pretty sure that just installing clecos and then letting the sealant cure before riveting leaves a much thicker layer of sealant between the rib and the skin. Far less desirable than the result attained if riveted wet, in my opinion.

Comment: I still prefer the Fay sealing method I used and described above. I am afraid by wet installing the rivets, the skin may pucker between the rivets; there is heavy force on the rivets and no force between the skins when wet riveting, in my opinion.

The riveting went fine. I had to drill out a few clinchers, because the Proseal makes everything slippery. Also, if I didn't press the rivet down in the hole and squeeze out the excess, I would invariably get a rivet sitting proud. I used a hemostat to place the rivet in the hole filled with Proseal, pushing lightly to squeeze out the excess goop. Then I cleaned off the outside with a acetone-damped rag, cleaned the mushroom set, and riveted. I found using lower air pressure and feathering the trigger helped set the rivets without clinching. With 30 grams mixed, I was able to set 3 rows on the bottom,  coat the shop heads, and fillet the three ribs, before the stuff started getting hard. It took me three nights over a week to get each skin on. With this fay sealing method, there was not a rush to set all the rivets in one session; I felt this made for much better results because I wasn't stressed trying to rivet everything before the Proseal set up.

The tanks skins and ribs are all riveted now. Looking back, I don't know why I was so apprehensive, but it was a learning experience. As a side note, I used MEK to clean the faying surfaces, but switched to acetone to remove the excess Proseal to try and preserve my MEK for more important tasks; I can no longer buy MEK locally.