Tuesday, March 1, 2022

Back to Finishing Canopy

 So I am back to the canopy again. I did not do the side skirts a year and a half ago when I was working the canopy because I thought they would be prone to damage during storage.

So I am doing the side skirts now. I am following a friend's method  The side skirts will be the Van's aluminum that are sika-flexed to the canopy and riveted to the canopy frame. I am going to paint the side skirts white to match the canopy frame. I think I found a Jet flex paint that matches the Van's white.

The rear skirt will be fiber glassed and sika-flex bonded to the canopy. (Although my canopy fit is good enough for a metal skirt, I presently have no rivets or screw holes in the plexiglass, and I do not want to add screw holes to hold the metal rear skirt)

The windscreen will be fitted last. I still have to paint the glare shield and the middle brace a light grey before installing the wind screen.


Finishing Up Under Panel

 While waiting to paint the dashboard, i was finishing up stuff under the panel. I decided to make a j bend in the vent tubing to keep the rain out. Not sure if it helps or not, but what the heck, I had the extra tubing anyway.


Last Structural Panel Installed

 We installed the last structural panel this weekend; The forward fuselage top panel.

Now it is on to canopy fiber glassing, cowl
and the gear.

Seats


 I am calling the seats done. I still have to do some of the of the interior stitching but haven't figured out a better way than my first try.
Maybe good enough for first flight. Sure beats pillows.

Since this picture was taken i re did the one seat with the stitching. I think I will leave the interior stitching off so that I can remove the foam and wash the seat covers after the first flight.

Tuesday, January 4, 2022

Fiberglass Work Begins

 Having gone as far as I could go on the instrumentation and engine work, I am starting on the fiberglass bits. This consists of the elevator and rudder tips and the canopy framing.

The fiberglass work is not hard, just takes time due to the cure times. And I was really smart to wait until it gets really cold, and not during the warmer months, to do this work. The epoxy takes forever to cure in the cold. Should have done this work in the summer, but I really wasn't ready then anyway.

The tips come preformed, but require the ends be capped off. I used fiberglass foam, with 2 layers of cloth, followed by an epoxy and micro-balloon mixture. I also sealed the top of the vertical stabilizer to avoid water getting in, if it ever rains in the desert.

The tail light I am using is from FlyLEDS. The Vans rudder fairing has a very small provision for the light. The bracket


that came with the light would not work (gold anodized bracket) so I made a custom one (the aluminum horse shoe shape). The supplied screws are metric, 3.0 x .5 mm.

Sunday, November 21, 2021

Lots of progress in the last few months. Here is a summary:

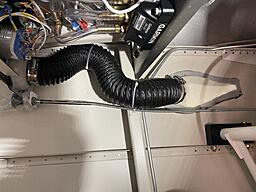
The engine is in and wired. At this stage, the instructions get a little sparse so it takes some time to figure out what others have done and decide on the best course. One area of isolationism is the fuel flow sensor, that red cube in the pictures. The firewall forward kit does not make provisions for it. Fortunately, my firewall forward kit had an extra fuel hose for the tail dragger version of my plane. I was able to use this extra hose to connect the red cube. The fuel lines are a little longer than I like, but adequate. 

Secondly, the position of hole in the firewall for the mixture cable I didn't like. I ended up moving it next to the throttle cable. The new location might make it more difficult to change the oil, but that only happens once every 25 hours (once a month I hope). In addition, the factory location did not work with the length of cable that was included in the firewall forward kit. ( I am unusual because most builders install a carbureted engine; but me, naw, I had  to go fuel injected. More Power)

Lastly, I am using the manifold pressure port on the right side of the engine. This required a longer hose to the sensor. Earls in Lawndale, CA made up a new line for me while I waited. What a great resource in the LA area when I visit.

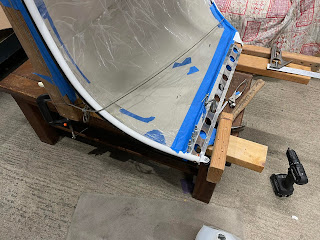
The last bit of interior painting was done on the throttle quadrant plate. I thought this would be too flimsy, but once attached to the back up cable support, this became very rigid.

The last thing I have to figure out on the engine side of the firewall is how to plumb the fuel hose from the throttle body, on the bottom of the engine, to the spider fuel distributor on the top. The Lycoming factory hose is too short. If I used the factory hose, it would make a mess of the baffles. I will have to order a new hose once the baffles are installed. 

My next step is to finish all the testing of the avionics to make sure there are no more wiring changes, and then install the last top skin on the fuselage.


Sunday, October 3, 2021

Instruments done, Engine in

 The instrument panel is installed and seems to be working well. I still have a few things to calibrate, but the radios work and I can talk to the tower. The plane can find the GPS, and receives the local glide slope fine.  I did have to re configure my radios thou. I had to make my remote radio Comm 1, and my panel mounted radio Com 2 and Nav 2 (VOR, ILS). This would allow the co pilot to work the panel radio and the pilot to work the remote radio if the pilot and co pilot wanted to split duties. The audio panel allows split comm so that pilot can talk on Com 1 and co pilot can talk on com2 to different control facilities. 

I also changed the RPM sense to use the P-lead as per the latest revision of the Garmin software. This avoids one more wire thru the firewall and avoids having to put a RPM sensor on the mag case.


After the instruments were in, we installed the engine. The plane is still on the wood stand to make things easier to get to. I read all the previous suggestions and it went in with little trouble.
I put the bottom bolts in first and then the top.
I also had to change the support brace prior to releasing all the load onto the fuselage; the old position of the brace was cause a slight warpage of the bottom skin so i moved it forward to just next to the firewall. Much better now.
I think it only took us 1 hour, at the most.

The Snap-on open end box fit three nuts perfectly; like it was designed for this. I had to grind a craftsman sacrificial box end to fit the upper left nut. That one has very little clearance from the push rod to the bolt to slide the wrench on.

Now it is time to finish up the instrumentation wiring with all the engine sensors; install the baffles, controls and cowling, and continue marching on towards first flight in 2022.