Sunday, January 22, 2017

Elevator Trim Tab

Today was a rainy day in Los Angeles; perfect day to be building. I knew it was going to rain, because the original internet (the sky) sent two bits of data yesterday from Santa Barbara saying it would be so. Here is a picture of the data; or maybe this was the dashed line you see on the weather maps.


So the elevator trim tab went well but I did not follow the directions verbatim. They say this is the part that everyone has trouble with, and if I had followed the directions exactly as written, I would have had trouble too. But planning this out yesterday, while the internet data was being received, I decide that there was a better way.

I followed the plans as written up until the trim tab horn is dimpled. I chose to dimple and rivet the trim tab horn after the ends were bent over. But let me walk through the order I did things.

I matched drilled the holes and deburred per the plans, but did not dimple any holes yet. I bent the trailing edge to the correct angle as per the plans using a 4 foot section of  2x 4 and some el cheapo hinges from the aviation aisle of Lowe's, as per the plans.

Then I built the bending blocks for the ends as per the plans.I practiced on some scrap aluminum until I felt comfortable working on the expensive stuff. I left the blue plastic on and used double sided tape to keep the blocks from moving as I dressed the ends.  This didn't work completely as planned, as the trailing edge in the forming blocks still moved a little as I bent over the ends; but still came out acceptable. I used a piece of 1" x 2" wood to start the bend. Then I used the flush rivet set in the rivet gun and really gently smashed over the edge till 90 degrees. I had previously filed in a 1/16" radius in the bending block to form a nice radius in the finished bend. I worked the gun back and forth until the bend radius was even without smashing it completely.


The skin area for the trim tab horn was not dimpled or riveted earlier (as the plans would have had you do) because then the trim tab wouldn't sit nicely in the forming blocks. So now I went back and dimpled the trim tab holes.It is interesting to note the #40 holes in the spar and the skin seemed to already be punched to final size, but I went back and reamed them anyway to clean up the holes.

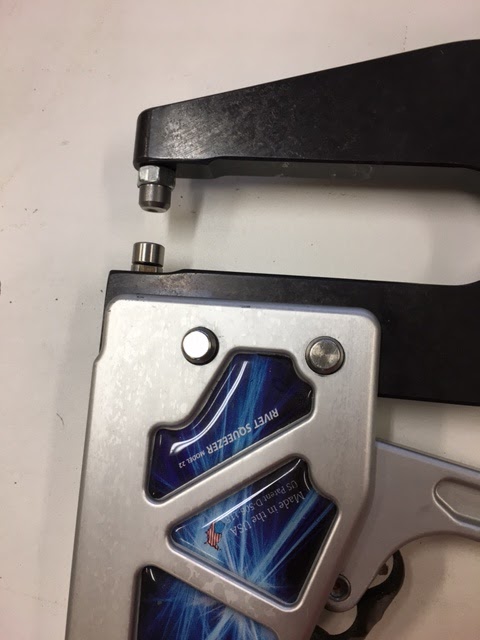
Then I riveted the trim tab horn to the skin, except for the trim tab to spar holes, per plans. There is a spare to skin hole outside of the trim tab that I didn't dimple before the trim tab horn was riveted on. So I had to dimple this after the trim tab horn was on. This presented a problem in that there was no enough room next to the horn for the dimple die to sit down properly. I ended up drilling a hole in some scrap aluminum the same thickness as the trim tam horn and dimpled these two sheets at the same time In the picture below you can see the hole and the scrap sheet. Next time, I will dimple this hole before the horn is riveted on. I also bonded the two halves of the trim tab together, using JB Weld, to keep the moisture from wicking in between and possible causing corrosion.


Next I deburred and dimpled the #30 holes in the ends. These get pop rivets later.

When riveting the spar to the lower trim tab skin, the tungsten bucking bar is essential. I don't feel this can be done without a tungsten bar because the normal bars are just too big.

Everything else that followed, was done per the plans. nothing special.

I should be seeing the replacement parts for the elevator tip rib in a few days, so I will be finishing that up.

Saturday, January 21, 2017

Elevator, Left Side

The left side elevator started out much smoother than the right. I was able to get the stiffeners back riveted no sweet by using the same method as the right elevator. Here is a picture of how I did it. The plans says to use rivet tape and tape all the rivets in place. I don't like that. My general rule is to have the pieces tight together before riveting. So, I used a completely different method since I know more than the guys at the factory who have built 20 more years of airplanes than me.:-)

So my method uses a cleco in the hole adjacent to the one I am riveting. The rivet plate is taped to the bench and cardboard is used to hold the assembly up off the table. The cardboard has a cut out for the clecos that hold the stiffener to the skin. I start at the trailing edge and insert a rivet one at a time, back rivet and then advance to the next hole. Since I am not using tape against the rivet, the rivet gets marred by the vibration of the rivet gun; but I am painting, so I don't care. The clecos keeps the skin straight as I flex and contort it to get the gun on the rivets.

The spar went well but I learned from the right side and made all the bottom rivets the pull type (with the larger dash 4 hole size) I guess if I really wanted to, I could  squeeze dash 4 solid rivets in the holes I could get too, but that seems like over kill.

But again, riveting  on the tip gave me trouble. More so than the previous elevator tip. The new parts will be here this week. We don't need to discuss this further, but lets just say, the new tools (1/8" double offset rivet set) will also be here this week. And another lessons learned, make sure the bucking bar is on the rivet and not sitting on a cleco holding the skins together. Last lessons learned, take pictures of riveting setups. Part of this trouble came about because I forgot the exact setup I had used successfully on the right side for the same rivets. Moving on...

I have started to work the elevator trim tab. It is not as bad as others make it out to be... yet. But it seems many before me have had trouble bending the skin tabs down. Knowing this, I will probably make up so samples and perfect my technique before doing the flight parts. Now I am off to cut the grass, paint the house, loose weight, before I start building again.... OK maybe just cut the grass... Naw, lets get building!

Sunday, January 1, 2017

Elevator, Right Side

The right elevator is coming along but I had trouble getting to the two rivets shown in the picture below that are back in the gap at the top left of the blue-covered skin. Turns out I was assembling the tip rib incorrectly; the tip skin goes underneath the main skin, I had the main skin underneath the tip skin. By doing it the right way, the main skin can be opened up, providing good access to these rivets. When I followed the directions, it was easy.


On the bottom skin, when attaching it to the spar, the instructions said I could use either all pop rivets or a mix of pop rivets and the much stronger squeezed rivets. I chose to use a mix of pop and squeezed rivets. This made it much harder. I think if I were to build another elevator, I would just use all pulled rivets for the bottom skin to spar; much easier and less grief than having a combo of the two.

For bonding the trailing edge, I used the T88 epoxy instead of the tank sealant. The T88 is mentioned on the plans as an alternate material. I hoped it will provide less pillowing and better bond on the trailing edge than what I had on the rudder. But I have a feeling the pillowing and bonding is due to the metal being riveted so close to the edge, not the bond material. OK I give, the main reason I used the epoxy is because it is a 1 to 1 mix, whereas the tank sealant is a 4.5 to 1 mix. I didn't have a good enough scale to weigh out the sealant and I didn't want to wait three days for Amazon to bring me one. Previously on the rudder, when I mixed the tank sealant, I discovered my Target scale did not read fractions of a gram, so I guessed the mix ratios and luckily got it right.

In summary the right elevator took quite a bit longer than the rudder; mostly because there are many more rivets and the lessons learned on the rudder provided a bit of education and familiarity.

Once the epoxy dried, I riveted the trailing edge per the instructions. This went much better than the rudder, but still had the same seperation of the skin very slightly from the AEX tapered strip. I eliminated puckering between the rivets by gently squeezing out the epoxy with a seaming pliers. I think the only way to keep the skin tight tot the trailing edge is to use some structural adhesive, like JB weld, or to edge break the trailing edge before dimpling. I will try the edge break method on the left training edge.Edge breaking puts a slight crease in the skin edge so it sits tight to the AEX tapered piece. This is described in the plans.

Overall I am happy with the right elevator. I think I could do a perfect job on the left now with this experience. (Right !!! wishful thinking see next post.)
 

Wednesday, December 21, 2016

Elevators

So now that the rudder is done (less the fiberglass work) I have moved on to the elevators. Not much different than the rudder. The construction seems to be not any more difficult, except for the trim tab, but no worries. The elevator tip ribs have several rivet holes in the trailing edge that are very tight. However, turns out the factory has pre-dimpled these holes. Thank you,... thank you very much. In blogs of builders who have come before me, this had been a problem so this stress I don't have to deal with.
One thing the plans didn't tell is how to deal with the trim plate that holds the trim servo or the trim cable. By looking at other blogs, I figured out the rivets that hold the nut plates need to be countersunk. I chose to do this before assembly. The plate is a little thin, but these rivets are non structural since the screws will hold everything together when assembled, so I am not worried about over countersinking. This turned out to be a non-issue.

I am ready to start assembly of the elevators, but wouldn't you know it, its raining in Los Angeles, go figure. So am on hold until I can spray primer. Maybe I should re-introduce myself to the kids ;-)
So got the elevator skins, ribs and all remaining parts primed today. I found it much easier to deburr and prime the skins and ribs before match drilling. What I did was to deburr the holes as they came from the factory using 300 grit paper, then wiped down the inside of the skin with lacquer thinner, let dry and prime. When I get around to match drilling to final size, I will use a reamer instead of a drill bit and touch up the holes afterward with a counter sink. Using the reamer, it seems the major burrs are from the factory punch, not from match drilling.
In order to prime the skins, I built a jig to hold open the skins.

Friday, November 25, 2016

Rudder Fun

Well I have been working on the rudder. By far the most difficult part to date. This piece requires taking the time to plan and figure things out.

I didn't want to buck all the rivets because my bucked rivets are not as good as those when I use the squeezer. So I had to buy a 4" yoke for the squeezer to reach the rivets.

Also the screws that hold the lead counter weight are #10 with a 100 degree countersink. So had to get a #10 dimple die for this screw. Lastly, I had to relieve the lead weight to clear the forward most rivets of the rib.


I needed what is called a longeron yoke to get the rivets on the control bracket, but didn't have one. I ended up putting a nut under the rivet set on the squeezer and this worked.


When I riveted on the doublers and nut plates to the spar, the 3/8" heim joints would not screw in. So I drilled out the rivets, inserted the heim joints in the nut plates and then riveted the doublers and nut plates to the spar. This was the only way to get everything lined up while riveting and I had to use the  4" yoke and longeron trick.

To make the trailing edge angle tooling that will hold it straight while assembling, I match drill all the trailing edge parts, then double sided taped the AEX strip to the aluminum angle and match drilled the angle to the AEX strip using the drill press.

When countersinking the trailing edge AEX piece I made a simple wood jig and used a allen wrench that was just big enough to hold the trailing edge flat.


No where in the instruction manual did it say when to rivet on the rudder bracket. This should be done just before the first skin is riveted on. I riveted the top of the skin near the balanced weight, and then had to carefully lift it up to get the rivets squeezed holding the bottom bracket; it would have been better to do the bracket before the skin.

As per the instructions, I  bonded the trailing edge together with pro-seal using the aluminum angle tooling on the outside to keep everything straight, waited three days, and then riveted. The trailing edge came out straight, but I seem to have gotten some separation of the trailing edge skins from the AEX wedge, and some pillowing between the rivets. This really bothered me until I read other blogs, and I am not the first. There is pro-seal on all the surfaces, so it is not an adhesion problem. Maybe it was too thick. Next time I will use a scrap pick of angle and squeeze the trailing edge together using seaming pliers immediately after assembly. This should squeeze out the extra pro-seal leaving a very thin layer to bond, hopefully eliminating the pillowing. For the separation, I tried re-riveting the end but it didn't change anything. It is acceptable, just not preferred. Maybe in a year or two, if I haven't come up with anything better, I was thinking of adding some JB weld to the seam to fill in the gap, making for a rigid, impervious, blunt trailing edge; nothing I can do about the pillowing an it is very slight. 


Monday, November 14, 2016

"Just keep swimming.." Dori

I was able to add some wall art to my shop, namely the completed horizontal and vertical stabilizer!
The vertical stab came out good but not great. I vowed to improve my riveting technique half way through..I had a problem with the rivet gun slipping while using the mushroom set for the flush rivets. This would cause a minor smiley or indentation in the skin. I decided to try some double sided tape to see if it would help. I was worried about it leaving the rivets set high. Turns out it worked great. It was sticky enough to keep the mushroom set from slipping, but not sticky enough to prevent removal. You can see in the picture the first rivet I did with this strip of tape left a circular indentation in the tape, but it came away intact from the rivet/surface. I think this is the new way for me when riveting with the gun solo.

Now onto the rudder and elevator.  I was able to prep, mix the primer, shoot, and clean up the mess in about 4 hours. Not too bad and I think worth the effort.. I love the 2 part primer; so much better then the rattle can stuff. If I add drying time into this analysis, priming with 2 part is less time than rattle can, and cheaper too. My prep was simple, wipe with acetone, then shoot, being careful not to touch the surface with my hands. And I did this before dimpling. I am only priming the inside part of the skins, but both sides of ribs, spars, and everything else.

Sunday, November 6, 2016

Priming lessons

So....
Started using the proper primer instead of the rattle can stuff from the local auto parts store. This is the same Sherwin Williams P60G2 primer that Vans Aircraft uses, but in the US it is tinted green.

There is a fellow builder, Sam, using  Dupont Veriprime615s. He seems to have had great success brushing the primer on. This sounded great and easy. So I tried that technique with the SW P60G2 on the rear spar of the horizontal stabilizer. Here are my results:

They have a molted appearance, but all the metal is covered, and it isn't too thick... But man is it fugly (really ugly).

So I bit the bullet and decided to brush up on my painting skills using a spray gun (pun intended). I was 18 the last time I painted aircraft parts with epoxy paint; all I remember is plan and prep, plan and prep.  I was going to build a spray booth, or downdraft table,  but this was a lot of infrastructure, and stressing over this became no fun. So I just decided to keep it simple and spray the stuff with cardboard on an old table. The stuff dries really fast once sprayed. And the over spray is easy to control since it is going on very thin; not much worse than rattle cans.

It worked out well. The primer was hard to get stirred up, until I took it to a paint store and had them shake it. Mixing the catalyst was easy, felt just like old times. My prep is simple: Scotchbrite the dimples and very smooth areas of the skins and spars, wipe down with acetone using gloves, and then spray. I didn't go for this 3 stage process others are using with etch, alodine, and whatever. (Some people don't even prime, and the plane comes out fine; do you believe that? ;-)

Below is my vertical stuff all primed. Maybe I will wait a day before assembling, to give it time to harden.

This has been a yuge learning curve but now time to move on. Not sure if I will prime the wings or not. But probably wont prime the fuse because I will be crawling in there a lot and I want the reflection of the metal to help with lighting during inspection.